
- Layout Considerations
- Fan Mounting
- Installation Guidelines
- Motor Installation
- Special Installation Guide for Bodine 098 and 6144 DC Motors with Bodine 790 Speed Controller Download PDF (208k)
- Installation Guide for Bodine Gear Motor Model 2294 and Bondine Gear Model 2272 Download PDF (844k)
- Belt Installation
- Lineshaft Installation
- Motor Installation
- Powering Fans at Various Levels
- Maintenance
Layout Considerations.
Since the fans are powered by a central electric motor one must first decide where to locate the motor. The motor can be visible or placed in a closet, adjoining room, or on a separate floor. While the noise created by the motor isn’t offensive, placing the motor in a hidden location will essentially create a silent system. One must also consider the electrical power source for the system. AC systems need only an ordinary 110-volt source and a regular light switch. The quieter, variable speed DC motors need a regular 110-volt source but also a transformer and speed dial, which are included with the motor. A licensed electrician should be used to connect the motor in either case. If speed regulation is desired the DC motor is recommended. The speed with the AC motor can be changed by the size of the pulleys. Speed can be determined at the time you order your fans. The appropriate speed range is between 40 and 100 revolutions per minute.
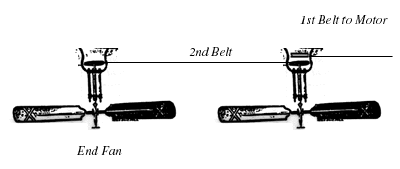
In the placement of the fans one should first take into consideration the ceiling height. The antique catalogs recommend the fan blades be 7 ft. from the floor. Next, the distance between fans should be no more than 15 ft. for round leather belts. Slightly longer distances can be achieved with flat belts. Transmission of power over greater distances will require horizontal line shafting or idler pulleys. Vertical pulleys on the lineshaft can easily power the horizontal fan pulleys as long as the center of the pulleys are in line. Vertical lineshafts are used to transmit power to various floors or ceiling heights. Architectural obstacles can be overcome by idlers or short line shafts.
The belts must run on a level and unobstructed path between the fans. If the belts must run between rooms careful measurements must be taken in determining the hole placement in the walls so the belts don’t rub. If the belts need to travel around corners, idler pulleys or line shafts will be necessary.
Most layouts are very simple and straightforward. Any concerns will be gladly discussed by Woolen Mill.
Top of Page
Fan Mounting.
Only competent carpenters and licensed electricians should install these systems. It is important to not overtighten bolts or belts as this could cause the casting to break. Also remember to use the enclosed blue Locktite on all set screws before tightening. If it is necessary to remove pulleys from fans, this can be done but the blade hub cannot be removed. Use the blue Locktite on pulley set screws after replacing the pulley.
Fans need to be secured to a solid, wide joist or solid framing in the ceiling that provides adequate support. The fans may be bolted to a solid beam or attached to a disk that is mounted to a solid support. For example, with a post and beam ceiling the fans may be mounted directly to the beam without a disk. The disks are recommended when mounting fans to a plaster or tin ceiling. The disks are sent without pre-drilled holes so you may determine the mounting method.
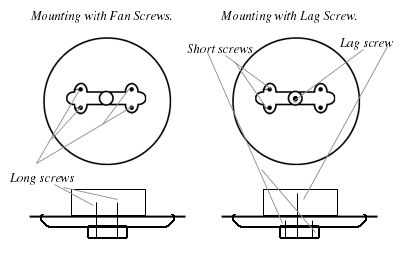
Your two main mounting options are (1) to use the fan screws to go through the casting, disk and into the joist; and (2) to use a 5/8″ lag screw up through the center of the fan (if applicable), the disk and into the joist with shorter screws securing the fan to the disk. The single lag screw is used when the joist is not wide enough for the fan screw method or when it’s evident you’ll need the ability to rotate the fan for belt alignment. It is recommended to use the single lag method with the Peacock fan. All hardware for the method of mounting that you indicated when ordering is included in designated envelopes. Be sure to drill the holes slightly smaller than the screws.
When mounting the fans be sure the belting will not rub on the fan frames. The Peacock fan requires that the belt be in a figure 8 configuration in order to avoid the frame. Once the fan is hung, the blades can be attached.
Below are illustrations showing two methods for mounting your fan to the ceiling.
Motor Installation.
The motor should be mounted so that its shaft is vertical and the motor is horizontal. The motor must always be horizontal for lubrication purposes. The motor should be attached with 4 lag screws to a substantial frame or joist. DO NOT MOUNT THE MOTOR ON BARE DRYWALL OR PLASTER. There must be adequate open space around the motor to allow for adequate cooling, so be certain that nothing obstructs the airflow around the motor. Once the motor is mounted, the pulley is placed on the shaft so it is in line level with the pulley on the first fan. If the larger pulley is used then the motor must be mounted on a block to give enough clearance for the pulley. These blocks are available from Woolen Mill.
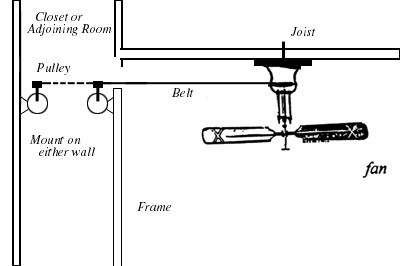
The motor may be installed in the same room as the fan, in an adjoining room or closet, or above in a room or attic space. Below is a diagram showing how to mount the motor in an adjoining room or closet. The motor can be mounted on either wall however care must be taken that the opening in the wall is large enough and lined up properly so that the belt does not rub.
Instructions for hooking the motor up electrically come with the motor. A standard light switch may be used for turning the fan off and on.
Below is a diagram of how to install the motor in an attic or unused room above the fan. You will need to have access to the motor and it should not be enclosed. It will be necessary to have measurements to order the extra shaft from the motor to the driver pulley. An additional fan body will also be needed to house the driver pulley. 0731 K-2 Parallel Shaft or 5473 30R-D Series Bodine Motors.
- Download the Installation Guidefor Bodine 098 and 6144 DC Motors with
Bodine 790 Speed Controller
Belt Installation.
1. Hang the fans. The end fan will have only one pulley. All other fans will have at least 2 pulleys.
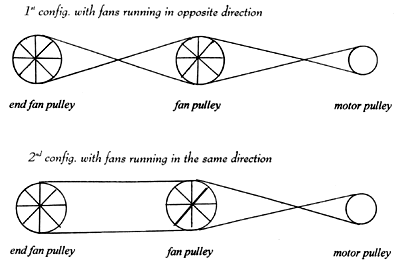
2. Decide in which direction you want each fan to run. When the belts run in a figure 8 pattern the fans will run in opposite directions. If you wish to run them in the same direction, simply run the belts parallel. The advantage of running the belts in a figure 8 pattern is that there is more belt to pulley contact and therefore better drive. On the Peacock fan the belting must be run in a figure 8 pattern so it won’t rub on the frame. If you are using the small pulley on the motor, then it is best to run the belt in a figure 8 to the first fan. See the following diagrams for possible configurations.
Note: For fans that you want to use a figure 8 pattern with, it is best to run and connect the belting straight then slide the belt off one pulley, turn it upside down and slide it back on the pulley. However, be sure to check whether your fan will allow you to do this or not. If not then run the belting in a figure 8 when you connect it.
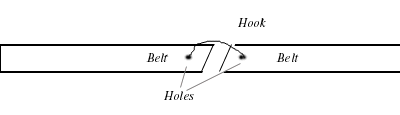
3. Starting with the end fan, run the correct amount of belting to the bottom pulley of the next fan. The belting should be snug with no droop or slack. Connect the belting by drilling a small hole in the two ends of the belt (unless you are using the alligator clip). The hole should be about a quarter of an inch from the end and large enough for the clip to hook in. Pull the belt tight and hook the connector. The round belting will connect using a clip that butts the two ends of the belt together. The flat belting can be connected with a pop rivet where the belting overlaps (holes line up to put rivet through) or with an alligator clip (instructions provided with it). DO NOT OVERTIGHTEN.
4. In time the belts will stretch. Tighten them by unhooking the clip, cutting an inch or more off the belt, and drilling new holes to rehook. Over time the belts will stretch less. Flat belts should have less of a stretch problem.
Top of Page
Lineshaft Installation.
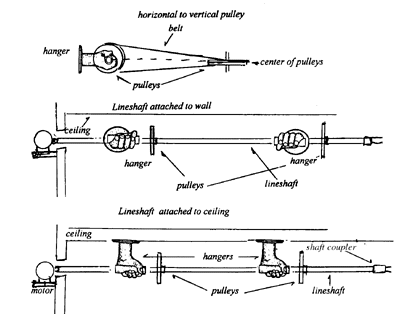
If there are long distances between fans or architectural structures become obstacles, a lineshaft or idler pulley may be needed. Lineshafts are mounted horizontally with the shaft directly coupled to the motor output shaft or with a pulley on the motor output driving the lineshaft. These require that the motor be mounted on a horizontal bracket so that the output shaft is horizontal. Shafting is available in various lengths and hangers are required at least every 8 feet.
The hangers may be mounted on a wall or the ceiling and must be attached with 4 screws to a solid surface, post or joist. The bearings are slid on the shaft into the hanger followed by a shaft collar. It is recommended that the lineshaft be assembled before installation to be sure the shaft turns easily. If it doesn’t then shims will be necessary when mounting the hangers.
The pulleys are mounted on the lineshaft vertically. A vertical pulley can drive a horizontal fan pulley as long as they are at least 2 feet apart. The center of the pulleys need to be on a level line with each other.
An idler pulley is made up of one hanger and a very short shaft with a pulley. This can be mounted vertically or horizontally on a wall or ceiling depending on the obstacle which must be circumvented.
Powering Fans at Various Levels.
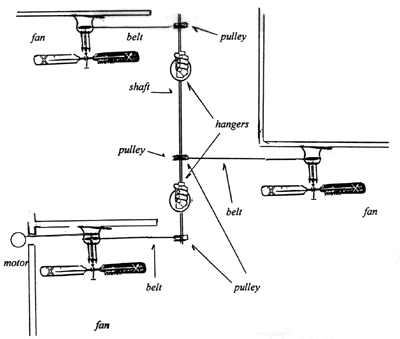
Below is an illustration showing how to power fans on different levels or floors. For safety it is important to shield shafting which is in reach with tubing that encases the shaft while still allowing it to rotate.
When a large number of fans are to be operated this way it may be necessary to use flat belts. See the section on Lineshaft Installation for details about installation.
Maintenance.
With proper care your fan will give you years of service. The maintenance required is minimal, however belt and pulley fans need more attention than other fans. The return on owning these systems will far outweigh the servicing.
The belts will need to be tightened occasionally (see Installing the Belts section). This is especially true with the round leather belting. The flat neoprene belts have less of a stretching problem. Temperature changes will cause this more than use. Leather belts should be treated occasionally with a leather treatment oil such as Neatsfoot oil or Emu oil. As the leather ages, stretching will become less of an issue.
All fans employ sealed bearings so oiling is not an issue. Any maintenance required by the motor is described in the instructions enclosed from the motor manufacturer. The fan bodies just require a periodic dusting and the wood blades and disk can be cleaned with furniture polish. This will keep the wood from drying out.
Enjoy your elegant fans!